http://www.lavideofilmmaker.com/filmmaking/film-lighting-tips.html
Why filmmaking needs lights
The reason for which lights are necessary in
filmmaking is that film, and to an even greater extent video, does not respond to light the same way our eyes do. Specifically,
film and video see things in a much more contrasty way. In other words, they cannot cope with the
lighting contrast of real life: if you shoot a scene without artificial lights, either the shadows will go completely black or the highlights will go completely white. All of this means that if you want a scene to look natural, ironically the only way to do that is to have enough light to make film see the scene the way our eyes see the scene.
In any case, there is more to cinematography than simply making the actors visible and photographing them. For top results, the mood of the film must be carefully crafted with lighting, amongst other things. Not to mention the fact that there are many situations in which natural light will not result in exposure at all. For example, there is no way you can do an exterior night shoot without lights, even if there is a full moon.
There are other considerations I could make. For example, it has been noticed by many filmmakers and filmgoers that the best films present a heightened interpretation of reality; in other words, films that touch our hearts tend to offer a world that is “more real than real.” This is simply a way of saying that they are not bland. Presenting an enhanced view of reality involves using highly stylized lighting.
One of the biggest myths is that shooting video requires fewer lights than shooting on film. This is completely incorrect, because film can handle a much larger contrast range than video, and therefore suffers less if the lighting is excessively high-contrast. Video, on the other hand, has enormous problems looking even remotely decent when the lighting is not perfectly fine-tuned in such a way that the brightest spot in the scene it is no more than three stops hotter than the darkest point in the scene. Therefore, ironically, film is in theory the best choice when there is little or no control of the lighting, but
the impressive lighting set-ups used on 35mm shoots has intimidated people into thinking that celluloid needs more light than video. The opposite is true.
Soft front light / hot backlight
A popular technique in film lighting is to use a soft (diffuse) light source from the front and a stronger, more directional light from the back, so that your subject has a hot edge. The soft frontal light is known as the fill light; the strong light at the back is known, unsurprisingly, as the backlight.
You can arrange the lights in such a way as to leave darkness between the area illuminated by the backlight and the area illuminated by the fill light, depending on how moody you want the shot to be. This tends to work very well, although even the moodiest films tend to avoid leaving dark shadows on the faces of female talent.
For a slightly different look, the backlight can also be soft, but it should still be hotter than the fill.
You should light your film or video shot by shot. This means that when you relocate the camera to shoot a different angle, the lights must be moved as well to ensure the subject is always lit correctly. This is partly why films take so long to shoot.
Setting up lights is the most time-consuming task in film shoots. It is therefore good practice to shoot a scene in such a way as to minimize the need to relocate lights – in other words, shoot in the order of the lighting set-ups.
Mixing color temperatures
Using lights of different
color temperatures can be used to great effect. This simply means using lights of different color in the same shot. This was used to great effect by
James Cameron in the steel mill scene of “Terminator 2”, in which he used blue and orange light (motivated by moonlight and molten steel respectively).
The only caveat with this is that you must determine the relationship between the two different colors before filming, because it is not really possible, for example, to make the blue bluer without also making the orange bluer (i.e. less orange).
http://www.knicecreative.com/blog/importance-of-lighting-in-video-production/
Reasons why lighting is need in video production:
- Lighting can determine the mood of the video
Notice how you get a cold feeling on the back of your neck when your watching horror movies. The way the scene is lighted will have something to do it with that. Contrast and shadows can have more of an effect on a film scene than you know. Even in TV commercials or online content.
- Poor lighting = more time in the editing room
If your lighting on a set is not really up to snuff, it means your editors are going to end up paying for your mistake. Unless of course you want to go back and re-shoot the scenes, but that means even more time needed to complete your project (never good because more time means more money). If not that means your editors will have to do their best to fix the lighting in the editing software. Which could make the editing process longer.
- Light determines the quality of your project
If lighting isn’t done properly, a video production can go from top quality to a cheap video. Often you see bad examples of commercials either using too much artificial light or too little. Think about it, if a commercial came on TV that was low quality with so much artificial light where it looks like a home movie, would you still by that company’s product? (I’m guessing probably not-I wouldn’t).
Even basic lighting in a production will make a huge difference on a set. One technique that is known by most people in video production is three point lighting. It’s one of the most versatile lighting techniques and is pretty much the most basic one, but this one technique will make a huge difference in your production.
Three Point Lighting:
This is the main light of the three and is placed to the side of the camera and is the main light that helps light the subject of the video.
Fill light is the secondary light and is always placed on the opposite side from the key light. Helping to fill shadows casted by the key light.
Back light speaks for itself. It is the light that is placed on the back of the subject you are shooting. It helps distinguish the subject from the background of the scene and give them a three-dimensional look on camera.
Just using this basic technique of three point lighting will improve your video production’s quality immensely. There is noticeable difference in work that looks professional and work that doesn’t. Big part of that is lighting.
https://software.intel.com/sites/default/files/m/d/4/1/d/8/3d-figure-top.gif

https://en.wikipedia.org/wiki/Cinematic_techniques#Lighting_technique_and_aesthetics
Lighting technique and aesthetics
To achieve the results mentioned above, a Lighting Director may use a number or combination of Video Lights. These may include the Redhead or Open-face unit, The Fresnel Light, which gives you a little more control over the spill, or The Dedolight, which provides a more efficient light output and a beam which is easier to control.
[1]
https://www.cinema5d.com/common-types-of-film-lights/
Know your fixtures
Before we get into the types of film lights, let’s take a quick look at the two most common types of fixtures.
 Open Faced
An open faced lighting fixture is used to create hard light that casts hard shadows. It is not much more than a housing and reflector for the bulb, and provides nothing in between the bulb and the subject.
The commonly known 800W “Redhead” and 2000W “Blonde” are examples of open faced video lights.
 Fresnel
A Fresnel lens is a special type of lens that is divided into concentric circles, resulting in a much thinner lens than a conventional lens of the same power. This lens evens out the light and allows for the beam to be varied from flood to spot by changing the distance between the lamp/reflector unit and the lens.
Practicals
A practical light is considered any light source that will appear in the scene such as a table lamp, any visible interior light sources, even a hand held flashlight. Often existing bulbs are swapped out for those of different wattage or color temperature depending on the needed effect and desired contrast ratios within the scene.
Performance Factors
CRI
CRI stands for Color Rendering Index. It refers to the ability of a light source to properly and faithfully reveal the color of an object compared to an ideal or natural light source. The highest possible CRI is 100 and is attributed to a perfect black body (a tungsten light source is a perfect black body, as is the sun).
Color Temperature
Color temperature refers to the “color” of white light emitted by a light source based on that radiated by a perfect black body at a given temperature measured in degrees Kelvin.
White light can be warm (yellow/orange) or cool (blue) and our eyes automatically adjust. However, the color temperature of light sources and especially the mixing of different color temperatures becomes very important when designing film lighting.
Temperature Source
1,700 K: Match flame
1,850 K: Candle flame, sunset/sunrise
2,700–3,300 K: Incandescent lamps
4,100–4,150 K: Moonlight
5,000 K: Horizon daylight
5,500–6,000 K: Vertical daylight
6,500 K: Daylight, overcast
15,000–27,000 K Clear blue poleward sky
Know your light sources
Tungsten (Quartz Halogen/Tungsten Halogen)
Tungsten light sources are basically related to the same type of incandescent filament bulbs which until recently were common in homes and offices everywhere.

The key difference is that these use bulbs that take advantage of what is known as the halogen cycle. The pressurized halogen gas inside the bulb helps to redeposit evaporated tungsten metal back onto the filament. The glass bulb is made from a much stronger quartz or aluminosilicate glass. The lamps operate at a higher temperature than normal incandescent tungsten bulbs, and so they can achieve a higher color temperature, and higher luminous efficiency. They naturally produce a warm light, but blue color correction gels can be used to simulate daylight.
Tungsten lighting fixtures can be open faced or Fresnel up to about 20kW in power and are dimmable. They produce a continuous spectrum of light from near ultraviolet to infrared, producing near perfect color rendition.
When dimmed tungsten lights become warmer in color, so gels are needed to correct the color temperature.
Uses
Tungsten lighting is usually used to light interiors as it matches the warm light associated with domestic incandescent lighting.
Advantages
Near perfect color rendition
Low cost
Does not use mercury like CFLs (fluorescent) or mercury vapor lights
Better color temperature than standard tungsten
Longer life than a conventional incandescent
Instant on to full brightness, no warm up time, and it is dimmable
Disadvantages
Extremely hot
High power requirement
The lamp is sensitive to oils and cannot be touchedThe bulb is capable of blowing and sending hot glass shards outward. A screen or layer of glass on the outside of the lamp can protect users.
HMI

HMI stands for
Hydrargyrum medium-arc iodide and is a metal-halide gas discharge medium arc-length lamp.
A HMI bulb contains mercury vapor mixed with metal halides. An electrical arc between two electrodes excites the mercury vapor and metal halides resulting in a very high light output and luminous efficiency. HMI lamps are capable of between 85 and 108 lumens per watt, up to four times that of conventional incandescent lamps.
The specific mix of gases in a HMI bulb is designed to emit a 6000K color temperature light, closely matching natural sunlight. Electronic ballasts produce a flicker free light due to their very high frequency operation. Pulse width modulation can be used to dim HMI lights.
Uses
HMI’s are often used when high output is required and when recreating or augmenting sunlight shining into interiors, or for exterior lighting. Powerful HMI’s can be used to light large areas.
Advantages
Very high light output
Higher efficiency than incandescent lamps
High color temperature
Disadvantages
Relatively high cost, but this is balanced out by increased output
High power requirement
Requires an external ballast for arc ignition (up to 70,000 volts)
Dimming is possible only to about 50% and the color temperature increases in conjunction with dimming, thus creating a bluer light
If dropped while lit an HMI bulb can explode releasing super hot quartz glass and mercury vapor
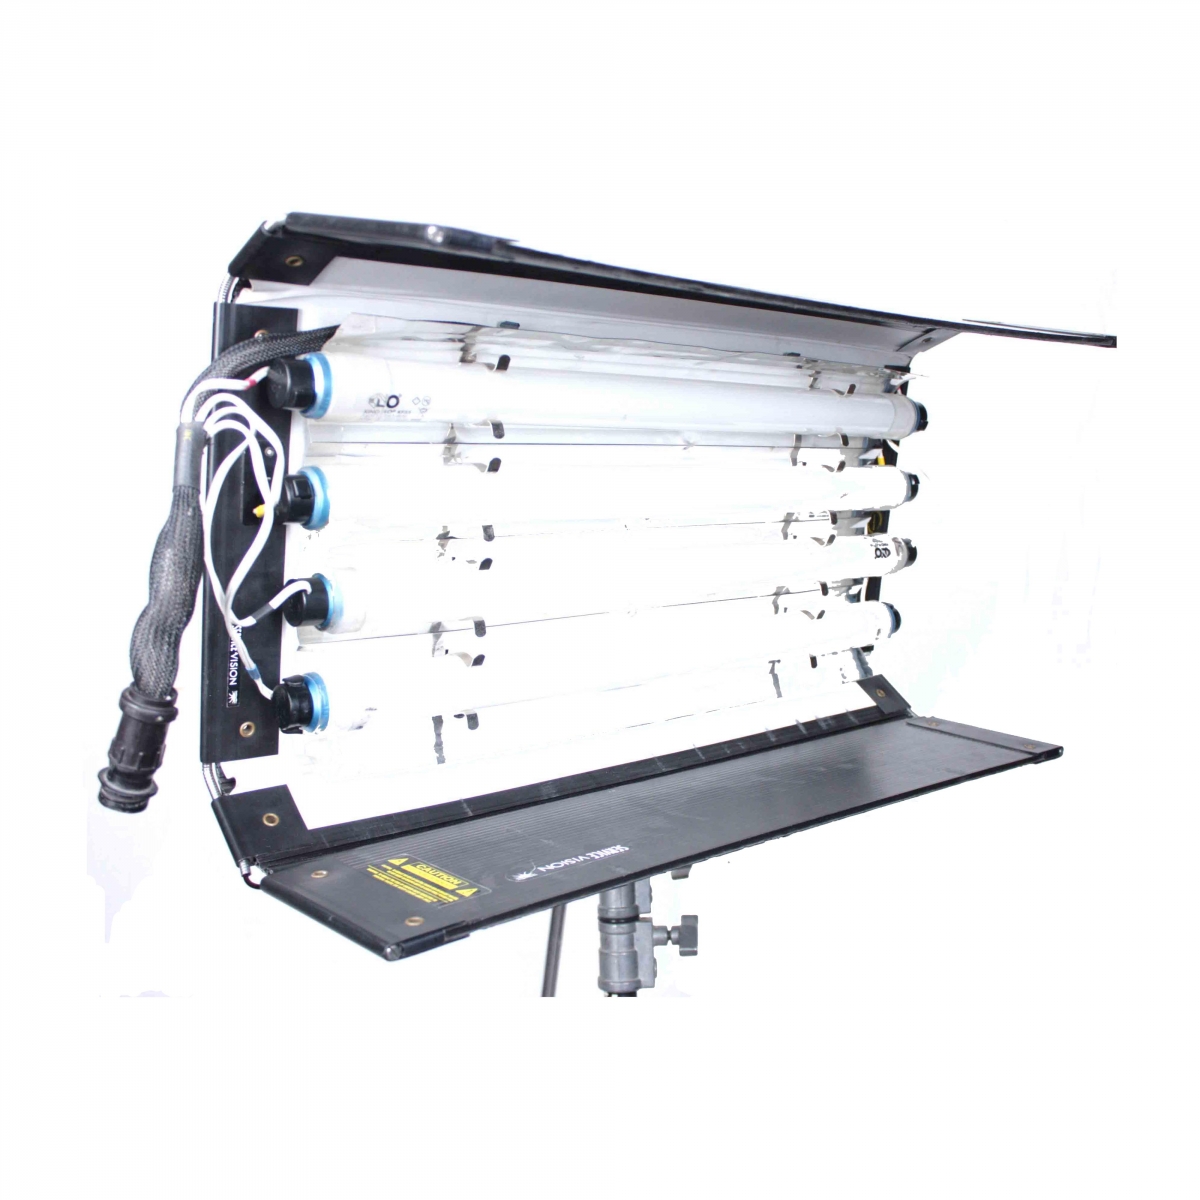
Fluorescent

A fluorescent lamp uses the excitement of low pressure mercury vapor to produce ultra-violet light, in turn causing a phosphor coating on the inside of the glass tube to glow giving off light in the visible spectrum.
A fluorescent light is much more efficient than an incandescent light, and is capable of generating up to 100 lumens per watt, similar to the output of HMI.
The spectrum of light emitted is different to an incandescent source and depends on the mix of phosphors used. However a CRI up to 99 can be achieved. The color temperature of a fluorescent can vary also from 2700K to 6500K depending on the phosphor mix.
Uses

Fluorescent film lighting is most often used in fixtures containing banks of tubes. These tubes are normally either tungsten or daylight color balanced, or the tubes can be mixed within the fixture to vary the overall color mix of the light. They produce a soft and even light and can be used in relative close proximity to the subject. Fluorescent lighting is often used to light interiors and has the advantage of being more compact and cooler in operation than tungsten or HMI lighting.
Advantages
High efficiency
Low power requirement
Low cost
Long lamp life
Cool
Capable of soft even lighting over a large area
Lightweight
Disadvantages
Flicker can be a problem with domestic fluorescent installations not intended for photographic use. Those designed for film use have electronic ballasts and produce flicker free light.
Fluorescent lights for film use have a high CRI, however the use of domestic tubes may have a far lower CRI and poor color rendition.
LED

LED stands for light emitting diode and is a solid-state semiconductor device. Only recently, LED’s of sufficient power have become available to make practical LED film lighting possible. LED’s are extremely efficient but are still limited in overall light output when compared to any of the other light sources.
LED’s are by nature monochromatic, producing only a single wavelength of light. So the challenge of LED lighting has been in creating a full spectrum white light. This can be done in two ways, either by combining the light of red, green and blue emitting LED’s, or with white LED’s whereby the visible white light is actually created by phosphors that are excited by an ultra-violet emitting LED.
LED lights can be daylight or tungsten balanced, sometimes switchable or having variable color temperature. Some have variable color through the entire RGB spectrum, which is something not possible with any other lighting technology. The CRI rating of LED lighting can be over 90.

Uses
LED’s are becoming more and more common on film sets. They can easily be battery powered making them very portable and requiring no separate ballasts or heavy cabling. Panels made from LED lights can be small and compact, or large for a variety of situations.
LED’s are also powering more traditional Fresnel style lamp heads such as the Arri L-series. Overall power outputs are on the rise, which is good news.
Advantages
Soft, even lighting
Pure light without UV-artifacts
High efficiency
Low power consumption, can be battery powered
Excellent dimming by means of pulse width modulation control
Long lifespan
Environmentally friendly
Insensitive to shock
No risk of explosion
Disadvantages
High cost. LED’s are currently still expensive for their total light output.
Luminous Efficiency Compared
Tungsten Quartz Halogen: Up to +/- 35lm/W
HMI: Up to +/- 115lm/W
Fluorescent: Up to +/- 100lm/W
LED: Up to +/- 150lm/W
There is no Winner
When all is said and done, all of these lights have a specific purpose, and you’re likely to see them all on any film set. Not one of these lights can be used for every purpose and any lighting kit list would be severely compromised if any of these were missing.

Big HMI’s are going nowhere. When you need to manufacture sunlight, the only way to do it is with big power hungry HMI’s. There is simply no other way to generate that amount of light. Yes, this means generator trucks and added crew, but when it comes to lighting big exteriors none of this is about to change. Even on a conservative job I would suggest having a 2K and 5K HMI available.
Tungsten light is cheap and is still the workhorse of interior lighting. LED Fresnel technology may at some point reach a practical equivalence but even with Arri’s most powerful L-series, it’s not going to replace the medium to high output Tungsten lamp heads soon.

LED’s are also a permanent addition to the lighting department. For space restricted setups and the sheer portability that battery power affords these lights have become indispensible.
Fluorescents provide a lovely soft even light. They offer higher output than LED panels and can be larger in size, although LED panels can of course be tiled. Fluorescents are also very cost effective.
That covers the most common types of film lighting, but it is only the beginning of the story. Creating light is one thing, but shaping and controlling it is the most important skill of all to learn.